

Knowledge Base
Connect your On-Premises Environment
Now that you are logged into Cloudockit (click here if you are not logged in yet), we can connect to your On-Premises environment.
Cloudockit is a solution that is 100% agent-free, meaning you do not have to install any agent or extension in your environment.
The way Cloudockit scans your Hyper-V or VMware environments is simple: execute a PowerShell script that calls built-in Hyper-V/VMWare PowerShell/PowerCLI Cmdlet and generate a .json file.
Afterward, upload the .json files into Cloudockit in order to generate the full documentation and diagrams.
Cloudockit On-Premises Interface
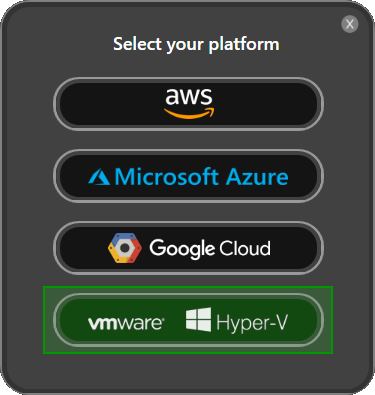
From the list of platforms, select VMware Hyper-V
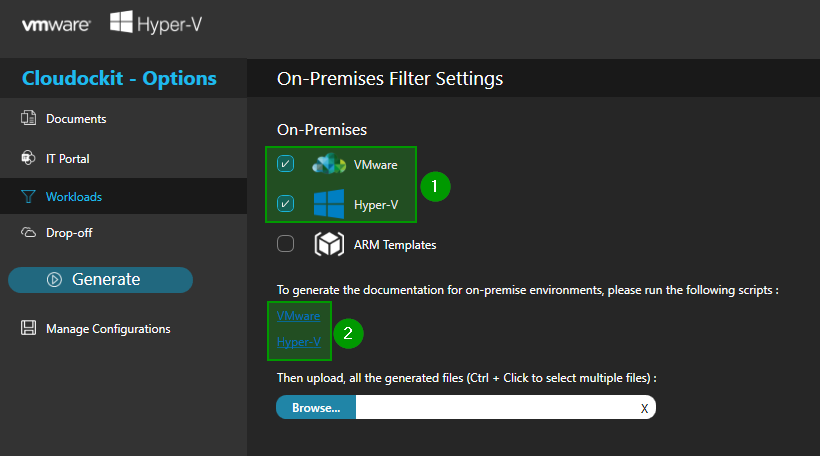
Once Cloudockit opens, navigate to the Workloads tab:
- Select your On-Premises virtualization solution.
- Click on the link to download the PowerShell script that corresponds to your environment (VMWare or Hyper-V)
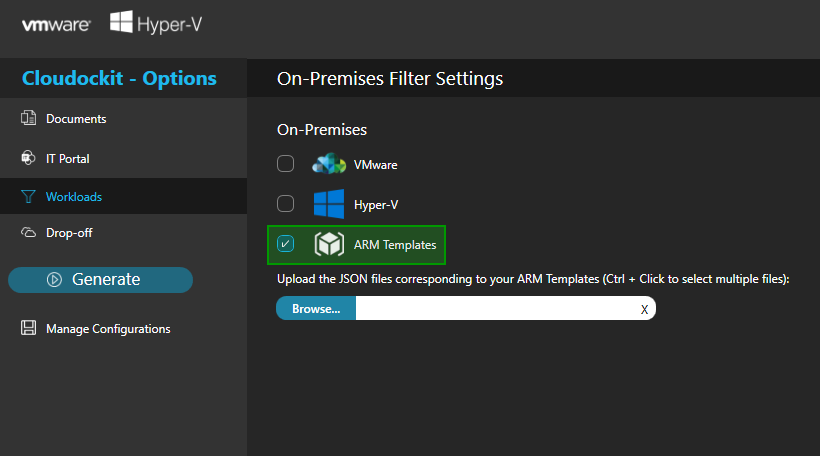
With ARM Templates (no script needed, just upload the ARM templates):
These scripts will scan your Hyper-V or VMware Host and retrieve the content that is necessary for Cloudockit to generate your documentation and your diagrams.
The scripts are readable and we made them simple by design so that you see what information gets extracted. The scripts extract the following information:
- Hosts Specifications (Nb CPUs, RAM…)
- Virtual Machine information (Nb CPUs, RAM, Name…)
- Network Card Information
- Virtual Hard Drives
VMWare
IMPORTANT: for VMWare, make sure you install the latest VMware.PowerCLI module before running our script.
You can find this module here: https://www.powershellgallery.com/packages/VMware.PowerCLI
#This script will collect the information needed by Cloudockit to generate the documentation
#It will generate an output file named THECOMPUTERNAME-cdk-export.json
#You will need to upload this file when generating your documentation

#PLEASE UPDATE THE CONNECTION INFORMATION HERE
Connect-VIServer -Server "Enter_ServerName_Here" -User "Enter_AdminUser_Here" -Password "Enter_AdminPwd_Here"

$virtualMachinesJSON = Get-VM | Select * -ExcludeProperty ExtensionData, Client | ConvertTo-Json -Compress
$nicsJSON = Get-VM | Get-NetworkAdapter | Select * -ExcludeProperty ExtensionData, Client, Parent | ConvertTo-Json -Compress
$hardDrivesJSON = Get-VM | Get-HardDisk | Select * -ExcludeProperty ExtensionData, Client, Parent | ConvertTo-Json -Compress
$onPremConfigurationJSON = "{`"exportType`" : `"vmware`",`"exportVersion`" : `"1.0`", `"virtualMachines`" : $virtualMachinesJSON, `"nics`" : $nicsJSON, `"hds`" : $hardDrivesJSON }"
$onPremConfigurationJSON > "$env:computername-cdk-export.json"
Hyper-V
IMPORTANT: for Hyper-V, make sure you install the latest Hyper-V PowerShell module before running our script.
More information: https://learn.microsoft.com/en-us/powershell/module/hyper-v
#This script will collect the information needed by Cloudockit to generate the documentation
#It will generate an output file named THECOMPUTERNAME-cdk-export.json
#You will need to upload this file when generating your documentation

$virtualMachinesJSON = Get-VM | ConvertTo-Json -Compress -Depth 5
$hostJSON = Get-VMHost| ConvertTo-Json -Compress -Depth 5
$onPremConfigurationJSON = "{`"exportType`" : `"hyperV`",`"exportVersion`" : `"1.0`", `"virtualMachines`" : $virtualMachinesJSON, `"host`" : $hostJSON }"
$onPremConfigurationJSON > "$env:computername-cdk-export.json"
Results
Once you run those scripts on all your hosts, you will get multiple xxx-cdk-export.json files that you need to upload to Cloudockit by clicking the Browse button in the Workloads page of Cloudockit.
To start the document generation, click on the Generate button