Azure AD Authentication with Azure SQL, Entity Framework and Dependency Injection
Azure Active Directory and SQL Server Setup
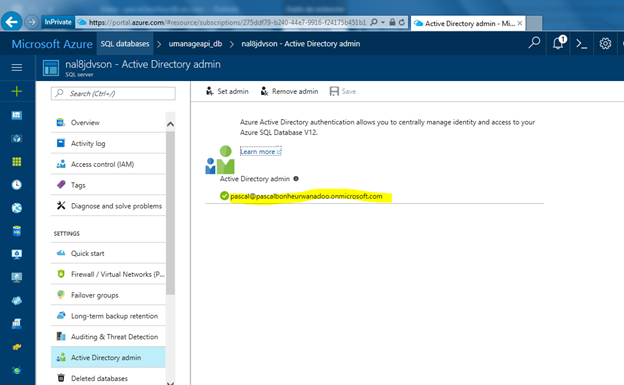
As a first step, allow the AAD Authentication in your Azure SQL Server. To do so, you need to add an Active Directory Admin.

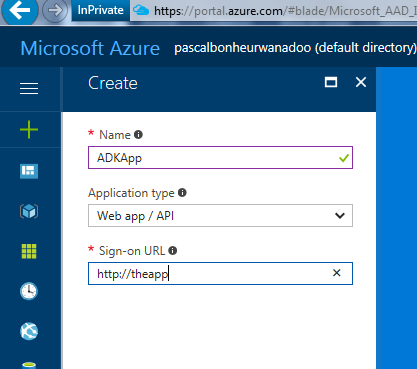
Once this is done, create an Azure Active Directory Application that will be used by the Web Application to connect to the SQL Database. This AAD Application can be seen as a service account.
Navigate to the AAD Blade and create an AAD application.

For simplicity, we will use the client “secret” to do the authentication and not a certificate. Certificate is recommended for production environment.
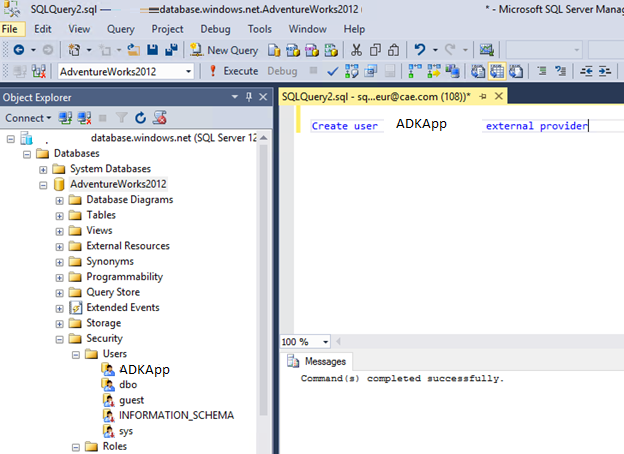
When the AAD Application is created, the next step is to allow it to access to SQL as an Azure AD user. To do so, add it as an External User in SQL: This is exactly the same as adding a classic AD Account in an On Premise SQL Server.

As you can see, once the command line is executed, the ADKApp appears under Users menu.
Then, you must grant some privileges to this new user:
GRANT SELECT TO ADKApp
You are now ready to consume the SQL from the Web App using AAD Authentication. Let’s see the code of the App.
Implement the App to connect to SQL using AAD
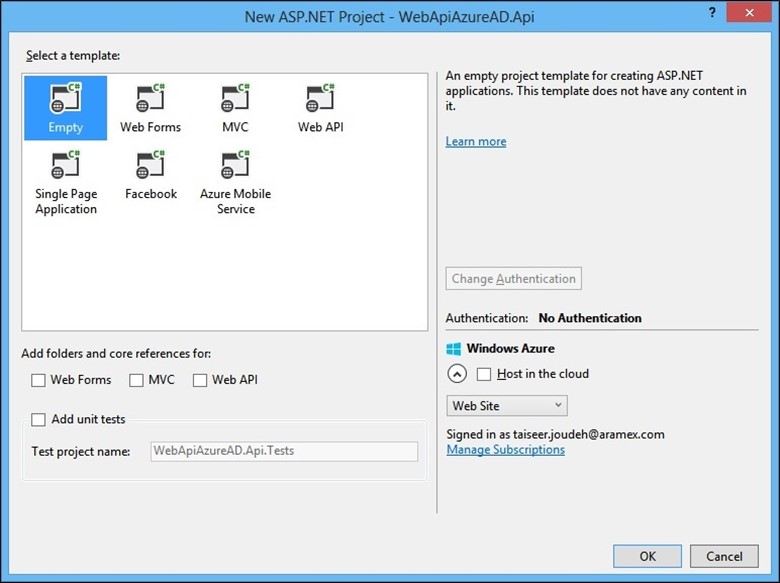
From Visual Studio, Create a MVC Web Application in the Cloud Section.

Install Azure Active Directory nuggets packages as this is required to get the token to authentication to AAD.
Add a new Controller Named Home and enter the following code (cf. comments for the details of what the code is doing):
public class HomeController : Controller
{
public List<string> products { get; set; }
public async Task<ActionResult> Index()
{
//Create connection
SqlConnectionStringBuilder builder = new
SqlConnectionStringBuilder();
builder[“Data Source”] = “adkserver.database.windows.net”;
builder[“Initial Catalog”] = “AdventureWorks2012”;
builder[“Connect Timeout”] = 30;
//Get Token from AAD. This is where the authentication of the ADKApp happens with AAD. Cf bellow for the code of this method
string accessToken = await
TokenFactory.GetAccessToken();
if (accessToken == null)
{
Console.WriteLine(“Fail to acquire the token to the database.”);
}
products = new List<string>();
using (SqlConnection connection = new SqlConnection(builder.ConnectionString))
{
SqlCommand cmd = new
SqlCommand();
cmd.CommandText = “SELECT Name FROM HumanResources.Department”;
cmd.CommandType = CommandType.Text;
cmd.Connection = connection;
//Set the access token in the connection string
//This is where the magic happen : we provide the Access Token returned by AAD to send to Azure SQL that will ensure that this token is valid
connection.AccessToken = accessToken;
connection.Open();
SqlDataReader reader = cmd.ExecuteReader();
// Data is accessible through the DataReader object here.
while (reader.Read())
{
products.Add(reader[0].ToString());
}
connection.Close();
}
return View(this);
}
}
The code to retrieve the token from AAD (Step 2 and 3 in the global diagram) is as follow:
authContext = new AuthenticationContext(authority);
clientCred = new ClientCredential(clientId, key);
AcquireToken().Wait();
return token;
Where clientID and key are from the ADKApp in AAD and authority is the AAD Tenant where the authentication happens.
Use Entity Framework
What was done until now, was standard AAD Authentication with SQL and we will now have a look on how to implement that using Entity Framework (EF).
When you use EF, the main concept is a context that is used to access the data in the database.
Here is a simple EF Context that contains only a Table with Addresses:
public class ADKContext : DbContext
{
public IDbSet<Address> Addresses { get; set; }
protected override void OnModelCreating(DbModelBuilder modelBuilder)
{
base.OnModelCreating(modelBuilder);
modelBuilder.Configurations.Add(new
AddressConfiguration());
}
}
With AdressConfiguration doing the mapping (manual in our case) between the Addresses and the actual table in AdventureWorks Database:
class AddressConfiguration : EntityTypeConfiguration<Address>
{
public AddressConfiguration()
{
ToTable(“[Person].[Address]”);
HasKey(x => x.AddressLine1);
Property(x => x.AddressLine1).HasColumnName(“AddressLine1”).IsRequired();
}
}
Address class is as follows:
public class Address
{
public string AddressLine1 { get; set; }
}
The ADKContext we have created is not compatible with AAD authentication. To implement it, we need to override the creation of the context and specify a connection that we build and where we will specify the Token required for AAD Authentication. Here is the updated class:
public class ADKContext : DbContext
{
public static string AADTOken;
public IDbSet<Adress> Adresses { get; set; }
// override the context creation and use the Connection constructor that will call the PrepareAADConnection method that is in charge of building the connection with the access token
public ADKContext() : base(PrepareAADConnection(),true)
{
}
private static SqlConnection PrepareAADConnection()
{
//Create connection
SqlConnectionStringBuilder builder = new SqlConnectionStringBuilder();
builder[“Data Source”] = “adkserver.database.windows.net”;
builder[“Initial Catalog”] = “AdventureWorks2012”; builder[“Connect Timeout”] = 30;
string cnx = builder.ConnectionString;
SqlConnection connection = new
SqlConnection(cnx);
// Specify the token. We will see later in the example where the ADKContext.AADToken comes from
connection.AccessToken = ADKContext.AADTOken;
connection.Open();
return connection;
}
protected override void OnModelCreating(DbModelBuilder modelBuilder)
{
base.OnModelCreating(modelBuilder);
modelBuilder.Configurations.Add(new
AdressConfiguration());
}
}
Now the EF Context will be created with a connection that uses the AAD Token.
Cloudockit’s diagram generator will save you time and money
Use Dependency Injection
Usually EF Context is used in services layers but they may also be used in Controllers. If this is your case, you want to avoid modifying all Controllers to include the custom AAD Connection creation.
To do so, you can use the Unity nugget package to dynamically inject the EF Context to the constructor.
First, install the nugget package and then create an Interface that your Context will implement (for Type resolution):
public interface IADKContext
{
}
And change the signature of your EF Context to:
public class ADKContext : DbContext, IADKContext
When your Unity is installed, it will create a Container that will be used for Type Resolution to do Injections:
public static class Bootstrapper
{
public static void Initialise()
{
var container = BuildUnityContainer();
DependencyResolver.SetResolver(new
UnityDependencyResolver(container));
}
private static IUnityContainer BuildUnityContainer()
{
var container = new
UnityContainer();
// register all your components with the container here
// it is NOT necessary to register your controllers
container.RegisterType<ADKContext, IADKContext>();
return container;
}
}
public class Global : HttpApplication
{
void Application_Start(object sender, EventArgs e)
{
// Code that runs on application startup
AreaRegistration.RegisterAllAreas();
GlobalConfiguration.Configure(WebApiConfig.Register);
RouteConfig.RegisterRoutes(RouteTable.Routes);
ADKContext.AADTOken = TokenFactory.GetAccessToken().Result;
Bootstrapper.Initialise();
}
Now you are all set, you just need to change your controllers to this:
public class HomeController : Controller
{
private readonly ADKContext _adkCTX;
public HomeController(ADKContext adkCTX)
{
_adkCTX = adkCTX;
}
Important note: Remember that tokens expire! So, there is a need to implement a refresh mechanis.